Mapping is an integral part of Game-Mastering any roleplaying game. Maps are infinitely useful. They functionally visualize settlements (towns, fortresses), ships, or caves, ruins, and dungeons as well as over-maps of landscapes and countries. I also know it can be tough even to get started much less work through to a completed map.
Over a couple of decades of Game-Mastering, I have worked out a certain routine. A routine to follow when formulating and creating maps. Just to be sure of this, I took notes while I created the map for Manifold Maps #2. This routine can get my mind moving and the creative juices flowing even when caught at a standstill. Occasionally, however, I do still run into roadblocks.
Portions of the map I am not happy with or the inability to get a solid picture of what I am trying to do are common obstacles. I also sometimes just seem to run out of ideas somewhere near the beginning. I have learned to work through these dry spells. However, I never try to force it. Eventually, not counting for a possible time-crunch though, I can get going at it again. Although I can stall out for more than a day or two sometimes. Most map-making does involve some stops and starts.
Writing this piece was a personal exploration into my own creative process once I started to realize that I had a process and was working through steps to achieve a completed piece that I was ultimately satisfied with. I hope that others will in the very least find this interesting if not helpful in their own mapping endeavors. The first step in map-making is to have a symbol key at the ready.
Make the Master Key
It is important to have a clear and legible symbol key. This is in order to populate your maps with objects, features, and scenery not to mention encounters, treasures, and traps. A Map Key also sometimes referred to as a Legend is a listing of symbols with their meanings. It is needed to understand a map that uses its symbols. The key can be on the map itself often quartered off. However, often Games-masters(GMs) might want to use as much of the sheet as possible. So using a Master Key, a universal map key often on a separate sheet of paper, is most useful.

I have a standard master symbol key that I use for most of my maps. I also may use a few alternate symbols required in certain situations. The key that I use includes adopted symbols and has been refined over a period of several years. So, it might take a while to build or collect a master key suited to your purposes. Personally, I am more concerned when using my key with speed and clarity. I wanted to include symbols in my Legend that are easy to recognize and distinguish from each other. They also had to be easy to draw fast and easily especially when sketching. When in doubt, find already existing ones and crib and adapt them to your needs.
To Start With
I often start with the vision or concept of a single chamber. Which for one reason or another is interesting to me as well as clear in detail. It is often a central or entrance chamber that gives the players a visual taste or general atmosphere of the entire place but not always. Frankly, I grasp at whatever I can clearly visualize. This can be a central or entrance chamber, some side passage, or even the outside mouth/entrance to the place.
An alternate method is to just start laying down features then work a single chamber around those features. This to get the starting point from which to work outward. This I do when the first method is not working for me. This technique is a little more hit or miss. However, I usually come out with something if not a handful of possible chambers to begin plotting.
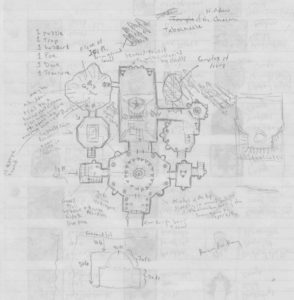
Going back to the visualized chamber; I will sketch this room and try to fumble around with surrounding chambers. How they relate on the map to the central chamber and how they connect. I make a real mess with a pencil on a piece of paper trying to refine the central chamber. Including as I try to find a layout and develop a few chambers that I can string together. This includes creating additional chambers to place on the paper like puzzle pieces, trying the best and most pleasing fit if not the most sadistic or unexpected configurations.
Once a map starts to form, I also try to gain another main idea that may add to the map in a few different ways. These central ideas or main features can include canyons, large pits or fissures, bodies of water, burrows or dugouts that were not a part of the original structure, historical additions or modifications, etc.
The Big Idea
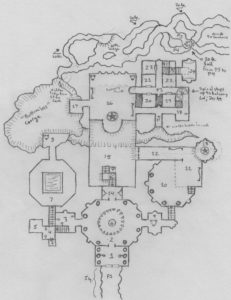
This idea should fill a decent portion of the map, run through it, or help to shape the map and arrangement of chambers. This idea can be a natural or not-so-natural feature, the purpose of the structure that I am mapping or the history of the place that would shape it or its features. With this in hand, I will take a new sheet of paper, sketch the chambers that I designed previously, and use my new idea to arrange the layout.
After I have the layout sketched, I try to add as many details to each chamber (using the SYMBOL KEY) as possible but not so much as to crowd the sketch. I also write notes (sometimes with arrows) around the sketch that I need to draw the refined rough draft or those that need to be included as notes for the map even if they are not present on the map itself. This is also the time that I start writing down ideas for a title.
The title is often times, but not always, based on the central feature or main idea of the map because it is easier to conceive of a name that way. Other things to consider when running through names for your map are its history, current or former uses, what or who may or did reside there, and its reputation (if any). I also like titles that are eye-catching i.e. sound cool and maybe a bit cheesy.
Refining the Rough
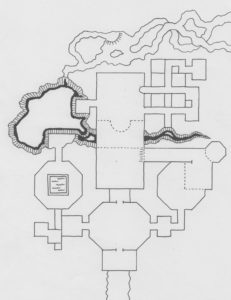
Now I have my messy pencil sketch. The next step is to carefully pencil a copy of the map on a piece of graph paper. I try to include any notes or symbols on the original rough version. In addition, I take the time to refine my map, add, change, or subtract chambers or other details. In addition, I decide which notes are convertible into symbols and the need for any new ones.
I prefer working with my hands although most of you might want to use other methods, which is fine. Also, I already have all the art supplies so I should use them. My roughs are done entirely in pencil. This refined rough draft is what I use as my blueprint.
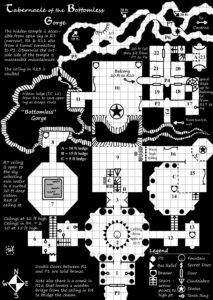
I then trace only the parts of the map I will ink. Those are scanned into Photoshop where I have all my Legend symbols ready to place. I trace the main non-keyed features and walls then clean it up in Photoshop. This is while dropping in the keyed elements and text resulting in the final draft of the map. Essentially, I use Photoshop to create the final polished version of the map. It looks cleaner and the quality is easier to reproduce across several maps if need be.
Recap
- Decide on a Master Key/Legend to use
- Try to come up with a single chamber as a starting point
- Refine it and start thinking about other chambers around it and how they fit together with it
- Add a central feature or idea to help shape the entire map
- Start penciling a rough draft from your preliminary sketches
- Trace off, detail, and refine a draft from the former that will be used as the map blueprint
- Draw your map based on that blueprint refining your design were necessary
Summation
It is through this process that I draw maps. These include those found in the Zombie Horror book and hopefully future publications. The difficulty really is coming up with the bits and pieces then fitting them together into a coherent, useful, and hopefully aesthetically pleasing map. Start small and work your way out adding in new, bigger ideas as you refine the map. Eventually, you will end up with a complete map. Remember that it does not have to be huge or too complex to be useful. Lastly, the tools to produce should not matter as much as your own personal skill and knowledge with them.

[do_widget id=”cool_tag_cloud-4″ title=false]